Bathroom Cleaning

Bathroom Cleaning

Clear vinegar cleaning spray bottle with simple design.

5 Vinegar Cleaning Easy Hacks for a Sparkling Home

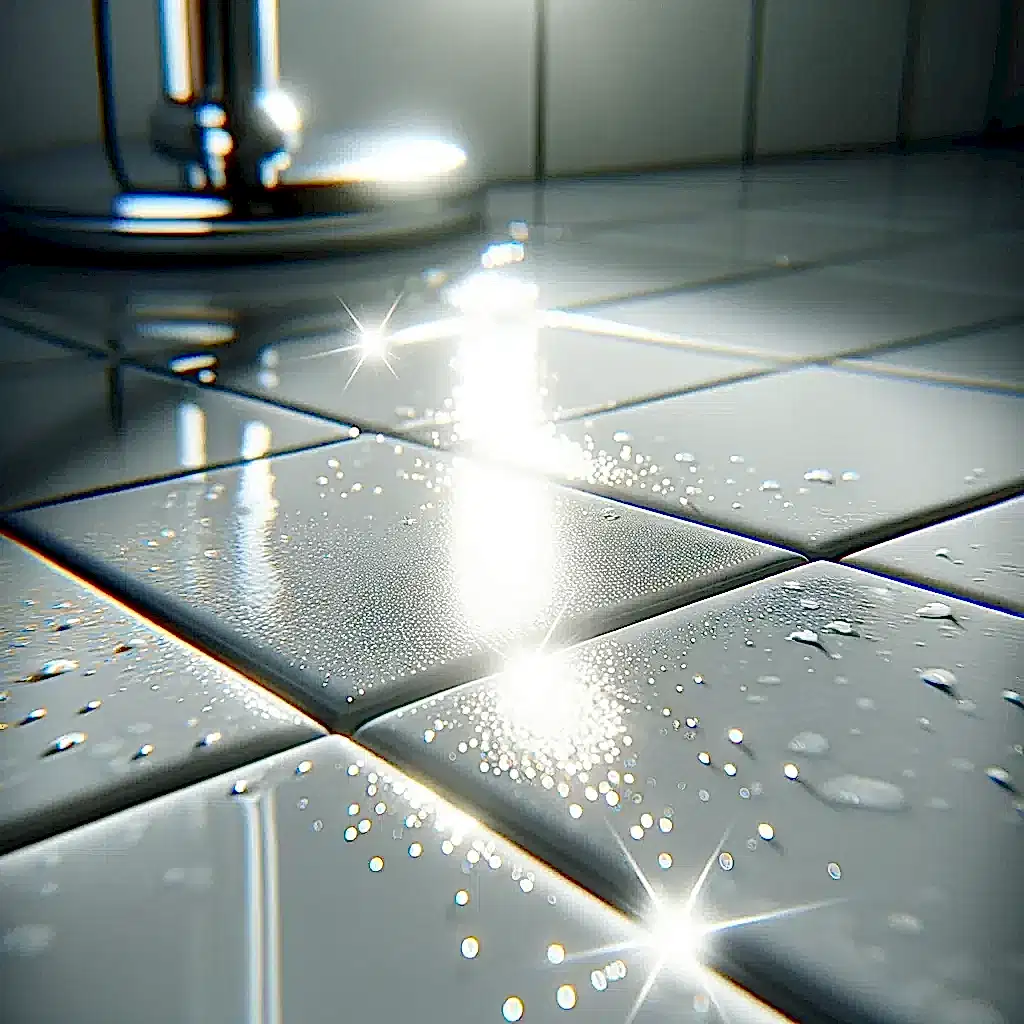
Oh, vinegar cleaning! It’s not just for salads anymore. This humble kitchen staple is a cleaning powerhouse, perfect for those of us looking to keep our homes sparkling without breaking the bank or resorting to harsh chemicals. So, grab your vinegar bottle, and let’s dive into 5 amazing cleaning hacks that will make your home shine brighter than ever. 1. Glass and Mirror Cleaner The beauty of this method isn’t just in its simplicity but also in its effectiveness and environmental friendliness. When you mix equal parts water and vinegar, you’re creating a powerful solution that tackles dirt, grime, and those mysterious fingerprints that seem to appear out of nowhere. Using a spray bottle for your vinegar solution isn’t just about convenience; it’s about precision. It allows you to evenly distribute the mixture over the surface, ensuring that every inch of your glass or mirror gets covered without soaking it. This is key to avoiding drips and ensuring a streak-free finish. Now, when it comes to the wiping part, there’s a bit of an art to it. Using a clean cloth is a great choice, especially if it’s made of microfiber. These cloths are designed to pick up and trap dirt, which means they’ll hold onto the grime you’re trying to get rid of instead of just smearing it around. If you’re in a pinch, though, newspaper is a surprisingly effective alternative. The ink acts as a mild abrasive, helping to polish the glass as you wipe. Plus, it’s a great way to recycle. The magic moment comes when you step back and see the result. That streak-free shine isn’t just satisfying; it’s a clear sign that you’ve cleaned effectively without the need for harsh chemicals. This method is gentle enough to use as often as you need, making it perfect for keeping your home looking its best. And let’s not overlook the cost-saving aspect. Vinegar is incredibly affordable, especially compared to specialized glass cleaners. By opting for this natural solution, you’re not just making a choice that’s better for the environment; you’re also being kind to your wallet.     2. Microwave Cleaner Microwaves, being the workhorses of the kitchen, often end up splattered with all sorts of food residues. These residues can become as stubborn as a stain on a favorite shirt, especially after being zapped, reheated, and forgotten over time. The vinegar and water solution is like a spa treatment for your microwave, penetrating and softening the splatters and spills that seemed permanent. When you heat this mixture until it’s boiling, the steam generated plays a crucial role in the cleaning process. It’s not just about the heat; it’s about the moisture saturating every corner of your microwave, reaching places that a cleaning cloth or sponge might miss. This steam envelops the hardened food particles, breaking down their defenses and making them vulnerable to a simple wipe. But why stop at just cleaning? This method also helps to deodorize your microwave. Let’s face it, the mix of aromas from reheated leftovers, popcorn, and who-knows-what-else can create a not-so-pleasant bouquet. Vinegar, with its natural deodorizing properties, tackles these odors head-on, leaving your microwave smelling fresher. There’s also an element of safety to consider with this cleaning hack. The simplicity of using just vinegar and water eliminates the need for chemical cleaners, which can leave behind residues that might not be something you want to mix with your next microwave meal. Plus, this method avoids the potential hazards of scrubbing around the microwave’s electronic components with a wet cloth. After the vinegar and water solution has done its job, and you’ve carefully removed the hot bowl, all it takes is a damp cloth or sponge to wipe away the now-loosened grime. The difference can be astonishing, transforming a splatter-covered microwave into a clean, welcoming appliance ready for its next task. This approach to microwave cleaning is not just about achieving cleanliness; it’s about maintaining the longevity and performance of one of the most used appliances in your kitchen. Regularly cleaning your microwave with this vinegar steam method can help ensure it operates efficiently, without the burden of built-up residues that can interfere with its function. 3. Shower Head Detox Hard water deposits, which are essentially mineral buildups, can transform a once powerful shower into a disappointing drizzle. This not only affects your shower experience but can also contribute to the wear and tear of your shower head over time. The beauty of using vinegar to tackle this problem lies in its simplicity and effectiveness, providing a straightforward solution to a common household annoyance. When you secure a bag filled with white vinegar around the shower head, you’re essentially giving it a deep soak in a natural descaling solution. Vinegar, with its acetic acid content, is naturally adept at breaking down the lime scale and mineral deposits that hard water leaves behind. This process doesn’t require harsh chemicals or expensive cleaners; it’s an eco-friendly and cost-effective method that utilizes something many of us already have in our kitchens. Leaving the vinegar to work its magic overnight is crucial for the detox process. This extended contact time allows the vinegar to penetrate and dissolve the mineral buildup thoroughly. It’s a no-scrub solution that requires minimal effort but delivers maximum results. The convenience of this method is undeniable; it works while you sleep, transforming a neglected shower head into a fully functioning fixture by morning. In the morning, when you remove the bag and give the shower head a quick rinse, you’re not just washing away vinegar. You’re rinsing off the remnants of what was clogging your shower head, revealing the full potential of your shower’s water flow. The difference can be immediately noticeable, with water pressure restored and water flow evenly distributed through the nozzles. It’s as if your shower head has been given a new lease on life, ready to provide you with the invigorating showers you deserve. Moreover, this detox method extends beyond just improving water flow. It

5 Vinegar Cleaning Easy Hacks for a Sparkling Home Read More »

Wet shower tiles in bathroom

5 Quick and Easy Ways to Remove Soap Scum from Shower Tiles

Hey there, fellow clean freaks! Are you tired of staring at that pesky soap scum on your shower tiles every morning? You know, those cloudy streaks that just refuse to leave no matter how much you glare at them? Well, it’s time to roll up your sleeves because I’ve got some nifty tricks to make your shower tiles sparkle again. Let’s dive into “5 Quick and Easy Ways to Remove Soap Scum from Shower Tiles” and turn that bathroom blunder into a shining success! 1. Vinegar: The Natural Wonder First, grab yourself a spray bottle. This will be your main tool in this cleaning adventure. Mix equal parts of white vinegar and water in it. This dilution is the perfect balance – strong enough to tackle the soap scum but gentle enough not to harm your tiles. Next, let’s get spraying. Coat those shower tiles generously with your vinegar solution. Be liberal with it; don’t hold back! Let this magical potion sit and work its wonders for about 10 minutes. This waiting period is crucial – it gives the vinegar time to break down the soap scum, making your scrubbing job much easier. After those 10 minutes have passed, it’s time for some elbow grease – but not too much! Scrub lightly with a non-abrasive brush or sponge. We don’t want to damage the beautiful finish of your tiles, after all. Gentle circular motions usually do the trick, helping to lift and remove the loosened soap scum. Finally, the grand finale – rinse off the tiles with water. You’ll likely notice the difference immediately. The once cloudy and streaky tiles should now be clear, clean, and shining. It’s almost like giving your shower a new lease on life!     2. Baking Soda: The Gentle Scrub It’s time to whip up a little magic. Mix the baking soda with water until it forms a paste. It should have the consistency of a thick frosting – easy to spread but not too runny. This paste is going to be your secret weapon against that stubborn soap scum. Now, with your homemade paste at the ready, it’s time to get down to business. Apply it directly onto the shower tiles. You can use your fingers or a spatula – whatever floats your boat. Cover the tiles evenly with this gritty, grime-fighting paste. Once you’ve got your tiles looking like a frosted cake, grab a soft brush or sponge. It’s scrubbing time, but remember, we’re going gentle. You don’t need to be a muscle-bound hero to get this job done. Scrub in circular motions, and you’ll feel the baking soda working its magic, breaking down the soap scum without any harsh chemicals or overwhelming fumes. After you’ve given the tiles a good, gentle scrubbing, it’s rinse time. Splash them with water and watch as the paste and all the soap scum it’s grabbed onto wash away. You might even find yourself saying out loud, “Wow, it’s actually working!” as you watch the grime disappear down the drain. 3. Commercial Cleaners: The Quick Fix Soap Scum When you choose a commercial cleaner, you’re not just picking up a bottle; you’re grabbing a specially formulated solution that’s been tried and tested to ensure it does the hard work for you. Just remember to follow the instructions on the label closely – these aren’t just suggestions, they’re the roadmap to a clean bathroom! Safety is paramount, so make sure you’re using the product as intended. Typically, using these cleaners is as easy as pie. You’ll usually start by spraying the cleaner directly onto the shower tiles. Make sure you’re covering all the affected areas. Then, patience is key. Let the cleaner sit for a few minutes as stated on the label. This dwell time is crucial for the solution to penetrate and break down the soap scum. After the waiting game, it’s time to rinse. Wash off the cleaner with water, and you should see a noticeable difference. The soap scum that was once clinging to your tiles should now be going down the drain. It’s like giving your shower a mini-makeover without breaking a sweat. One crucial tip to remember – ventilation. When using any commercial cleaning product, it’s important to keep your bathroom well-ventilated. Open a window, turn on the exhaust fan, or keep the door open. Proper ventilation helps to disperse any fumes and keeps the air in your bathroom fresh and safe to breathe. 4. Lemon Oil: For a Streak-Free Shine Imagine this: you’ve just finished cleaning your tiles using one of the methods we’ve talked about, and they’re looking pretty good. But, you want to take it to the next level. You want that “wow” factor. This is where lemon oil comes into play. It’s like the polish on a freshly cleaned car or the cherry on top of a sundae. Take a few drops of lemon oil – you don’t need much – and apply it to a soft cloth. This is your new best friend for adding that final touch. Gently wipe down the tiles with the cloth. As you do this, you’ll notice a couple of things happening. First, the lemon oil cuts through any remaining water marks or streaks, leaving behind a crystal-clear surface. It’s like giving your tiles a mini spa treatment. But the magic of lemon oil isn’t just in its cleaning power. As you wipe down the tiles, the air will start to fill with a fresh, citrusy scent. It’s uplifting and invigorating, transforming your bathroom into a serene haven. This aroma adds an extra layer of clean, making the whole room feel more refreshed and rejuvenated. Finally, as you step back to admire your handiwork, you’ll notice how the tiles seem to sparkle. Lemon oil leaves behind a subtle sheen that catches the light, giving your bathroom a polished, well-cared-for look. It’s these little details that make all the difference, turning a regular cleaning routine into something special. 5. Dish Soap &

5 Quick and Easy Ways to Remove Soap Scum from Shower Tiles Read More »

Open notebook with pen for daily journaling or note-taking

How to Simplify Your Life with an Easy Cleaning Routine 101

Hey there! Are you tired of feeling like cleaning your home is a never-ending, overwhelming task? I hear you! Let’s talk about how to simplify your life with an easy cleaning routine. Trust me, a few smart strategies can turn cleaning from a chore into something almost… enjoyable. Let’s dive in! Wave Goodbye to Cleaning Overwhelm! Ever feel like cleaning is a full-time job you didn’t sign up for? You’re not alone. But what if I told you that a simple, easy-to-follow cleaning routine could make all the difference? Imagine having more time to relax, knowing your home is just a few quick steps away from being guest-ready. That’s what we’re aiming for! The Magic of a Cleaning Routine Morning Tidy-up: Start Your Day Right Make Your Bed: It’s a game-changer! This simple act can instantly make your bedroom look neater and give you a sense of accomplishment first thing in the morning. Bathroom Quick Wipe: After your morning routine, take a minute to wipe down the bathroom counter and sink. It prevents toothpaste splatters and soap scum from building up. Breakfast Dishes: Clear and rinse plates and cups right after breakfast. It keeps your kitchen tidy and ready for the next meal. Evening Wind-down: A Cozy, Clean Retreat Living Spaces Tidy: Spend a few minutes straightening cushions, folding blankets, and organizing magazines or remotes. This quick tidying makes your space welcoming and relaxing for the evening. Sweep or Vacuum: Focus on the areas that get the most foot traffic, like the kitchen, living room, and hallways. This regular touch-up prevents dirt from spreading throughout your home. Dish Check: Make sure the kitchen sink is clear of dishes. Waking up to a clean kitchen sets a positive tone for the next day. Why This Works? Stress Reduction: When it comes to stress reduction, the power of a tidy space is undeniable. Clutter is more than just a physical presence; it can clutter your mind as well. An orderly space can be a haven for mental clarity, making it easier to focus on tasks or simply unwind. There’s also a unique sense of calm that comes from maintaining an organized environment. It offers you a sense of control in your daily life, which can be especially comforting during stressful times. Saves Time: Another key benefit of a daily cleaning routine is how much time it saves you in the long run. By cleaning a little each day, you prevent chores from accumulating into overwhelming tasks. This proactive approach means you won’t have to face those daunting, time-consuming cleaning sessions on your weekends. Regular maintenance of your space makes each cleaning task quicker and less labor-intensive. You’ll find that stains don’t set in, dust doesn’t pile up, and your spaces remain generally tidier and more inviting. Builds Good Habits: The development of good habits is perhaps one of the most significant long-term benefits of a daily cleaning routine. When you incorporate a bit of cleaning into your daily life, it becomes a routine rather than a dreaded chore. This habit formation gradually becomes more automatic, reducing the mental effort you need to remind yourself to do these tasks. Additionally, establishing good habits in one area of your life often leads to positive changes in other areas. A regular cleaning habit can inspire better organization and discipline in aspects like work or personal health, leading to an overall improvement in your lifestyle and well-being. Bonus Tip: Music or Podcasts: Listening to your favorite tunes or an engaging podcast can make cleaning feel less like a chore and more like a fun break.     Weekly Deep-Dive: Less is More The weekly deep-dive clean is all about being strategic and focusing on those areas that need a bit more attention than your daily tidy-up. Tackling these tasks effectively can make a significant difference in the overall cleanliness and ambiance of your home. Bathrooms: In the bathroom, the focus is on the toilets, sinks, counters, showers, and tubs. Using a disinfectant cleaner for the toilet bowl, along with cleaning the outer surfaces and base, is essential. A clean toilet can significantly uplift the bathroom’s cleanliness. For sinks and counters, removing all products and giving them a thorough wipe-down is crucial. Paying attention to the faucet is also important, as it can collect fingerprints and water spots. When it comes to showers and tubs, tackling soap scum and mildew with a dedicated bathroom cleaner is key. Grout lines might need special attention with a baking soda paste and a toothbrush. Floors: VFor floors, whether they’re carpeted, rugged, or hard surfaces, a thorough clean is necessary. Vacuuming carpets and rugs thoroughly, especially in high-traffic areas and under furniture, is vital. You might want to consider an occasional carpet freshener or a sprinkle of baking soda before vacuuming for added freshness. For hard floors, sweeping or vacuuming first to remove debris and then mopping with a suitable cleaner for your floor type ensures a deep clean. Remember to reach those hard-to-reach areas like corners and under furniture. Dusting: Dusting involves all surfaces, including shelves, picture frames, and TV screens. Using a microfiber cloth to effectively trap dust is advisable. Don’t overlook hard-to-reach places, such as high spots like ceiling fans and the tops of cabinets, where a duster with a long handle can be particularly useful. Electronics also need attention as dust accumulates quickly on and around devices like TVs, computers, and stereos. Kitchen: In the kitchen, the focus is on appliances, countertops, sinks, and faucets. Wiping down the exterior of all appliances, including the fridge, oven, microwave, dishwasher, and even smaller ones like toasters and coffee makers, is essential. For countertops, clearing off all items and wiping them down with a cleaner suitable for the material, whether it’s granite, laminate, or stainless steel, is crucial. Scrubbing the sink with a non-scratching cleanser and polishing the faucet can add an extra shine. Monthly Focus: Tackle Those Forgotten Areas Taking time once a month to focus on areas

How to Simplify Your Life with an Easy Cleaning Routine 101 Read More »

Family putting up a Christmas tree

How to Achieve a Sparkling Clean Home this Holiday Season

A Clean Home this Holiday! A time of twinkling lights, warm cocoa, and… a little bit of chaos, right? It’s a season filled with joy, but let’s not sugarcoat it – it can get pretty hectic. From stringing up the lights to finding the perfect gifts, there’s a lot on your plate. And amidst all this festive frenzy, keeping your home clean might feel like a Herculean task. But hey, that’s where I come in with some easy-peasy strategies to help you keep your home not just clean, but holiday-card perfect! The Joy of a Clean Home for the Holidays Imagine this: You’re stepping into your home after a long day of holiday prep, and instead of a to-do list that seems a mile long, you’re greeted by a space that’s as calming as it is clean. This isn’t just about impressing your guests (though that’s a nice bonus!), it’s about creating a peaceful sanctuary for yourself during what can be the most wonderful, albeit busy, time of the year. So, how do you go about it? First up, think about setting the right vibe. A clean home during the holidays isn’t just about sparkling floors and dust-free shelves; it’s about crafting an environment that feels warm, welcoming, and oh-so-cozy. Imagine the scent of pine needles or your favorite holiday cookies wafting through the air, mingling with the soft glow of fairy lights. That’s the holiday spirit right there! Now, let’s talk about your game plan. The trick is to break down the overwhelming task of cleaning into manageable chunks. Maybe one day you tackle the living room, the next day the kitchen. It’s about finding a rhythm that works for you, without turning into the Grinch. Remember, the goal isn’t perfection – it’s about creating a space where memories can be made and enjoyed. Start with Decluttering Starting with decluttering is like setting the stage for a grand holiday show in your home. Think of it as prepping the canvas before you bring out the colors of your holiday décor. The mission here is simple yet transformative – clearing out the non-essentials to make room for festive cheer. Begin your decluttering adventure by walking into each room with a fresh pair of eyes. You’re on a treasure hunt, but instead of seeking out jewels, you’re looking for items that don’t belong in your holiday narrative. These could be stacks of magazines that have been piling up, summer clothes still lingering in your closet, or those random bits and bobs that mysteriously gather in every household. Each item you remove is like lifting a small weight off your home’s shoulders. Now, it’s not just about taking things away. It’s also about reorganizing what remains. This step is like a game of Tetris, where you find the perfect spot for each item. That summer gear? It might find a new home under the bed or in a storage bin. The infamous junk drawer? Give it a little love and attention, and you’ll be amazed at how much more functional your space becomes. Remember, the aim of decluttering isn’t just to make your home look neat for the holidays. It’s about creating a sense of order and tranquility. In a decluttered space, your holiday decorations will shine brighter, your rooms will feel more inviting, and you’ll find that your cleaning tasks become a whole lot easier. Less clutter means fewer places for dust to settle and less stuff to move around when you’re vacuuming or mopping. Deep Cleaning: Room by Room     The Kitchen: A Feast for the Senses The kitchen, undoubtedly, will be your holiday headquarters, buzzing with the aroma of delicious meals and the warmth of shared laughter. Start your deep cleaning saga here by focusing on your appliances. Your oven, microwave, and stovetop have been loyal companions throughout the year and now need a thorough scrub to be at their best. Then, move on to the countertops, where your culinary masterpieces will take shape. A sparkling clean surface not only looks inviting but also ensures a hygienic space for food preparation. Next, turn your attention to the floors, knowing they’ll soon witness the hustle and bustle of holiday cooking. A good mop can make them shine like new. The Living Room: The Stage for Memories Now, glide into the living room, the social hub of your home. This space will host everything from heartwarming chats to boisterous holiday games. Begin by dusting every surface. Each shelf, mantle, and corner should be free of dust bunnies, making way for your holiday decorations to take the spotlight. Next, those windows need a good cleaning to let the winter sunlight (or the twinkling lights from outside) filter through, adding to the room’s charm. And if you’re lucky enough to have a fireplace, give it the attention it deserves so it can be the heartwarming centerpiece for those chilly evenings. Lastly, vacuum or mop the floor, ensuring it’s pristine and inviting. Bedrooms & Bathrooms: Retreats of Comfort and Cleanliness Moving on to the bedrooms, especially if you’re hosting overnight guests, think comfort and coziness. Fresh linens are a must – they not only look inviting but also give that fresh, clean scent everyone loves. A quick decluttering here can also make the space more welcoming. In the bathrooms, aim for a level of cleanliness that would make a five-star hotel envious. Sparkling mirrors, spotless countertops, and a gleaming shower or tub will make your guests feel pampered. In each room, the goal is to create an environment that feels not just clean but also warmly inviting. It’s about setting the stage for the holiday magic to unfold, where every corner of your home contributes to the festive spirit. Happy deep cleaning! Focus on the Little Details Scent-sational Ambiance: Creating a delightful holiday atmosphere is as much about the scents as it is about the decor. The power of a festive fragrance can transport you straight into the holiday spirit. Start by

How to Achieve a Sparkling Clean Home this Holiday Season Read More »

Tesla, Electricity, Future

Revolutionizing Cleanliness: How Technology is Shaping the Cleaning Industry

Hey there, clean-freaks and tech-enthusiasts! Ever wondered how Revolutionizing Cleanliness in the cleaning industry is keeping pace with the dizzying advancements in technology? Well, strap in, because we’re about to dive into the sparkling world of high-tech cleanliness! The Tech Boom in Cleaning: A Sneak Peek In today’s fast-paced world, cleaning isn’t just about mops and buckets. It’s about smart gadgets, eco-friendly solutions, and, believe it or not, a bit of AI magic! Imagine walking into a room where a small robot whirs quietly, methodically making its way across your floor, leaving behind a trail of cleanliness. Or, consider the ease of using a mobile app to schedule your entire house cleaning routine, get product recommendations based on your preferences, or even remotely control smart cleaning devices. The future of cleaning embraces technology in a way that seamlessly integrates into our daily lives, enhancing efficiency and simplifying tasks. What’s truly exciting is the variety of innovations we’re seeing. From smart air purifiers that adjust their cleaning power based on air quality readings to window cleaners that stick to your panes and do the hard work for you, technology is redefining our concept of clean. And let’s not forget about the eco-friendly solutions coming into play. We’re talking about high-efficiency particulate air (HEPA) filters in vacuum cleaners that trap finer particles, reducing allergens in the air, and new cleaning agents that are tough on grime but gentle on the planet. Then, there’s the magic of AI. It’s not just about robots that can vacuum and mop. AI in cleaning involves complex algorithms that can learn your cleaning habits and preferences, suggesting optimized cleaning schedules and even alerting you to areas in your home that need extra attention. It’s like having a personal cleaning assistant that knows your home as well as you do, maybe even better! The blend of these smart, eco-friendly, and AI-driven solutions is transforming the cleaning industry from a task-driven to a tech-driven domain. It’s not just about getting the job done; it’s about how efficiently, effectively, and sustainably it can be done. This shift isn’t just making our lives easier; it’s revolutionizing the way we think about and approach cleaning. Smart Devices: The Future is Here Picture this: vacuums that map your home and clean autonomously, and apps that remind you when it’s time to scrub down the shower. Smart devices in cleaning are all about making your life easier and your home spick-and-span with minimal effort. These gadgets are not just cool to show off; they’re game-changers in maintaining cleanliness. Now, let’s dive a bit deeper into this world of smart cleaning devices. Imagine a robotic vacuum cleaner that not only maps out your entire house but also learns the layout over time. It knows which rooms are which, the best path to take for maximum efficiency, and even the areas that accumulate the most dirt. Some of these nifty gadgets come equipped with sensors that detect changes in surface types, adapting their cleaning method on the fly. Carpets? No problem. Hardwood? Easy-peasy. And let’s not forget about those hard-to-reach spots; these robots are designed to navigate around furniture and obstacles with ease. But it’s not just about robotic vacuums. There are smart mops that can tackle those sticky spills and grimy floors with the same level of autonomy and efficiency. Equipped with water tanks and the ability to dispense the right amount of moisture, they ensure your floors are not just clean but also properly cared for. Moving beyond floor cleaning, there are also smart devices designed to keep your air pure and free of allergens. Air purifiers equipped with smart technology can monitor the air quality in real-time, adjusting their settings automatically to filter out dust, pollen, and other airborne irritants. Some even offer smartphone integration, allowing you to monitor and control the air quality in your home no matter where you are. Then there are the apps. These are real game-changers in how we approach cleaning routines. With user-friendly interfaces, these apps can help you schedule cleaning sessions, remind you of maintenance tasks (like when to clean the filters in your devices), and even offer tips and tricks for efficient cleaning. Some even provide a platform for you to control all your smart cleaning devices from one place, making it easier to manage your entire cleaning arsenal.     Eco-friendly Solutions: Green is the New Clean The planet is thanking us, and it’s all thanks to eco-friendly cleaning technologies. Biodegradable cleaning agents, energy-efficient appliances, and waste-reducing tools are just the tip of the iceberg. These innovations are making cleaning an earth-loving affair! Let’s delve a little deeper into these green solutions. We’re talking about a new era of cleaning where every product and tool is designed with the planet in mind. Take biodegradable cleaning agents, for instance. These are not your average cleaners; they’re made from natural, plant-based ingredients that break down easily without harming the environment. This means that when you wash away that kitchen grease or bathroom grime, you’re not sending harmful chemicals down the drain. But the eco-friendly revolution doesn’t stop there. Energy-efficient appliances are taking center stage in the cleaning industry. Consider vacuum cleaners with eco-modes that consume less power or washing machines that use less water and energy. These appliances are meticulously engineered to deliver optimal cleaning performance while minimizing their carbon footprint. It’s a brilliant way of keeping your living spaces pristine without cranking up those utility bills or straining the planet’s resources. Then there are the waste-reducing tools. Ever heard of microfiber cloths? These little wonders are designed to be used over and over again, drastically reducing the need for disposable wipes and paper towels. They’re incredibly effective at picking up dirt and dust and can be easily tossed in the wash for repeated use. It’s a simple switch, but one that can significantly reduce household waste. And let’s not forget about water conservation. New-age cleaning technologies are focusing on ways to get the most

Revolutionizing Cleanliness: How Technology is Shaping the Cleaning Industry Read More »

Drain being cleaned, yellow cleaning gloves, foam

Easy Drain Change: DIY Cleaning and Maintenance for Your Sink

Hey there! Let’s dive into the world of DIY Drain Change, specifically focusing on that all-important task – changing and cleaning your drain. Trust me, it’s easier than you think and can save you a lot of hassle (and maybe even a call to the plumber!). So, grab your rubber gloves, and let’s get started! Why Bother with DIY Drain Maintenance? You’re probably thinking, “Why should I fiddle with the drain when I can easily call a professional?” I get it, but hear me out. Tackling drain maintenance yourself is not just about fixing a current issue. It’s about being proactive. Regular maintenance of your sink drain can prevent those dreaded clogs that sneak up on you at the least convenient times. Think about it – no more standing water in the sink when you’re rushing to get dishes done. But it’s not just about clogs. Regularly cleaning and maintaining your sink drain reduces wear and tear. This means your plumbing stays in better shape longer, saving you money in the long run. Plus, let’s not forget about odors. A well-maintained drain means a fresher-smelling kitchen or bathroom, and who doesn’t want that? Beyond the practical benefits, there’s something satisfying about rolling up your sleeves and taking care of your home. It’s empowering to know you can handle these tasks yourself. Plus, it’s a great skill to have – you never know when it’ll come in handy. Whether it’s a simple clean-up or a full drain change, DIY maintenance gives you a sense of accomplishment. You’re not just a homeowner; you’re a home caretaker, and there’s something genuinely rewarding about that. Tools You’ll Need Plunger: Always handy for minor clogs. Pipe Wrench or Pliers: For those tighter fittings. Drain Snake or Wire Hanger: Perfect for fishing out debris. Bucket: To catch any water or gunk. Rubber Gloves: Keep those hands clean! Baking Soda OR Vinegar: The dynamic duo for natural cleaning.   Step-by-Step Guide to Changing Your Sink Drain When it comes to changing your sink drain, it may seem like a task reserved for the pros, but with the right approach, it’s definitely something you can handle yourself. Here’s a more detailed walk-through of each step: Turn Off the Water: This is your first and most crucial step. Before you even touch the drain, ensure the water supply is off. This step is all about safety and preventing any unexpected water flow while you’re working. Locate the valves under your sink and turn them off – this is usually a simple twist. Remove the Old Drain: Next up, it’s time to remove the old drain. This is where your tools come into play. Grab your wrench or pliers, and gently loosen the fittings that hold the drain in place. It’s important to be patient and careful here to avoid damaging your sink. Once everything is loose, lift out the old drain. You might find this step a bit tricky if the old drain is stubborn, but with a bit of elbow grease, it’ll come right out. Clean the Area: Now that the old drain is out, you’ll probably notice some gunk or residue around the sink opening. This is the perfect time to clean it up. Take a cloth and some cleaning solution – you can even use that trusty baking soda and vinegar mix – and thoroughly clean around the area. This ensures that your new drain has a clean, smooth surface to adhere to. Install the New Drain: Here’s where things get a bit more technical, but don’t worry, it’s nothing you can’t handle. Start by applying plumber’s putty around the new drain – this helps create a watertight seal. Then, place the drain into the opening in your sink. From below, you’ll need to tighten it to secure it in place. This might require a bit of contorting under the sink, but think of it as part of the DIY adventure. Reconnect and Test: You’re almost there! Reconnect any pipes that were disconnected during the process. Once everything is snugly in place, it’s time to turn the water back on and test your handiwork. Turn on the tap and watch the water flow. What you’re looking for here is a smooth drain and no leaks. If everything looks good, congratulations – you’ve just successfully changed your sink drain! Through these steps, you not only fix a potential problem but also gain a deeper understanding of how your home works. It’s a great feeling to know you can rely on your own two hands to keep your home in tip-top shape. Cleaning and Unclogging Your Drain Unclogging and cleaning your drain doesn’t always require harsh chemicals or professional help. Here’s a revised approach that swaps out the boiling water solution for something different, yet just as effective: The Plunger Method: Begin with the simplest tool – the plunger. It’s often the most immediate and effective way to deal with a clogged sink. Ensure enough water in the sink to cover the plunger’s head, creating the necessary suction. Press down firmly and then pull up sharply. Repeat this action several times. The pressure created by this movement can dislodge most minor clogs, making the plunger an invaluable tool in your DIY plumbing arsenal. Salt, Baking Soda, and Warm Water: Replace the boiling water with a more gentle warm water solution. Start by mixing half a cup of salt with half a cup of baking soda. This combination creates an abrasive mixture that can break down gunk and grime. Pour this mixture down the clogged drain. Follow it with about two liters of warm water. The warmth helps to dissolve any residues, and the salt and baking soda work together to scrub away the clog. This method is particularly effective for maintenance and for unclogging drains that don’t respond to plunging. Using a Drain Snake or Wire Hanger: For those stubborn clogs that resist other methods, it’s time to get physical. Use a drain snake or a straightened

Easy Drain Change: DIY Cleaning and Maintenance for Your Sink Read More »

Warm and confortable winter, book, christmas

How to Master Winter Cleaning: Essential Tips for a Warm and Welcoming Home

Winter Cleaning is here, and let’s be real – it’s not just about sipping hot cocoa and watching the snowfall. Keeping our homes warm, cozy, and sparkling clean during these chilly months can seem like a tall order. The muddy boots traipsing through the hallway, those extra layers of clothing piling up, and the inevitable snow day chaos can quickly turn your cozy haven into a bit of a mess. It’s tempting to just curl up under a blanket and ignore it all, right? But here’s the thing: you don’t have to let your cleaning routine go into hibernation just because it’s cold outside. In fact, with some clever strategies and a bit of elbow grease, you can keep your home as inviting as a warm hug. The trick is to find the right balance – keeping things neat without feeling like you’re constantly battling against the winter elements. Why Winter Cleaning is Important Now, let’s talk about why winter cleaning is actually a big deal. It’s not just about making your space look tidy for the sake of it. Winter cleaning plays a huge role in creating an environment that’s more than just visually pleasing – it’s about making your home a sanctuary. A place where you can escape the cold, snuggle up, and truly relax. During winter, we spend a lot more time indoors (because, let’s face it, who wants to brave the cold more than necessary?), and that means our surroundings have a bigger impact on us than we might realize. A clean, well-organized home does wonders for your mood and overall well-being. It’s about clearing out the clutter, both physical and mental. It means coming back to a space that’s warm, welcoming, and peaceful – a space where you can unwind and recharge. Plus, let’s not forget the practical side of things. Regular cleaning in the winter helps keep those pesky germs at bay, making your home not just a cozy retreat, but a healthy one too. Tips to Ace Your Winter Cleaning     Start with a Deep Clean One of the best ways to kickstart your winter cleaning is by beginning with a deep clean. This is your chance to get ahead of the game before the winter chill fully takes hold. Think of it as preparing your home for the cozy days ahead. A deep clean isn’t just a regular once-over; it’s a detailed scrub down of every part of your home. Focus your efforts on areas that get the most traffic and use, like the kitchen, bathrooms, and living spaces. These are the areas where you and your family spend the most time, so you’ll want them to be extra clean and comfortable. When deep cleaning, it’s crucial not to overlook those spots that don’t often get much attention during regular cleaning sessions. We’re talking about those sneaky places like under the furniture, the tops of cabinets, and behind appliances. These areas can accumulate a surprising amount of dust, dirt, and grime over time. And let’s not forget about those high shelves and corners of rooms that are easy to overlook. Giving these areas a thorough clean can make a huge difference in the overall feel and cleanliness of your home. Now, if the thought of deep cleaning your entire home feels overwhelming, or if you simply don’t have the time, there’s always the option of calling in the pros. Professional cleaning services, such as Toronto Shine Cleaning, are experts at deep cleaning. They come equipped with all the tools and expertise needed to tackle every nook and cranny in your home. They can handle those hard-to-reach places and ensure that every inch of your space is sparkling clean. Plus, having a professional handle the deep clean can save you a lot of time and effort, allowing you to focus on enjoying the winter season in your freshly cleaned home. Create a Regular Cleaning Schedule Establishing a regular cleaning schedule is a game-changer when it comes to keeping your home tidy and comfortable during the winter months. Consistency really is key here. By setting a routine, you avoid the all-too-familiar scenario where cleaning tasks pile up, only to become an overwhelming mountain of chores. No one wants to spend their cozy winter weekends tackling a huge cleaning backlog! The beauty of a cleaning schedule lies in its ability to break down your cleaning tasks into manageable, bite-sized chunks. Instead of facing a daunting, full-house clean-up, you can focus on specific areas or tasks each day or week. For example, you might dedicate Mondays to dusting, Wednesdays to vacuuming, and Sundays to laundry. This way, you’re not trying to do everything at once, and your home stays consistently clean and inviting. Another tip is to tailor your cleaning schedule to your lifestyle and the specific needs of your home. Consider the areas that get the most use and might need more frequent attention. For instance, if you have a busy kitchen, it might need a quick daily tidy-up, whereas other areas of your home might only need a weekly once-over. Remember, the goal of a regular cleaning schedule is not just about maintaining cleanliness; it’s also about making your life easier. When you have a plan in place, you spend less time worrying about when to clean and more time enjoying your snug winter haven. Plus, a scheduled approach to cleaning means you’re less likely to overlook important tasks or areas of your home. Focus on High-Traffic Areas When it comes to winter cleaning, honing in on high-traffic areas in your home is a strategy that pays off immensely. These are the spots that get the most foot traffic and, consequently, accumulate the most dirt and grime. We’re talking about the bustling hubs of your home: the entrance, living room, kitchen, and any other area where your family and guests tend to congregate. The entrance, for instance, is your home’s first line of defense against the outside world. It’s where muddy boots

How to Master Winter Cleaning: Essential Tips for a Warm and Welcoming Home Read More »

Cleaning with blue cleaning gloves furnitures, deep cleaning

New Build, New Clean: How to Tackle Post-Construction Cleaning Like a Pro

Just wrapped up building or renovating your dream space? Big congrats are in order! There’s a pretty hefty task waiting for you: post-construction cleaning. And let me tell you, this is no ordinary tidy-up. This job requires a bit more elbow grease and attention to detail. It’s all about transforming your new space into a sparkling, healthy, and welcoming environment, from the shiny floors to the gleaming ceilings. What’s Post-Construction Cleaning Anyway? Picture this: You’ve just completed a construction or renovation project. What you’re left with is more than just a beautiful new space. There’s usually a whole lot of mess that comes along with it. Post-construction cleaning is that crucial final step in your building journey. It’s a deep, thorough clean-up of all the remnants of construction – and we’re talking about more than just a bit of dust and debris. This kind of cleaning goes way beyond just making your space look neat and tidy. It’s about diving into every nook and cranny to clear out: Dust Galore: Construction projects can create a surprising amount of dust. And this isn’t just any dust; it’s a mix of sawdust, drywall dust, and other fine particles that can find their way into every imaginable space. Debris and Scraps: Bits of materials, nails, screws, and other small items can be left behind. These need to be carefully picked up and disposed of to prevent any accidents. Those Pesky Paint Splatters: No matter how careful the painters are, there are bound to be drips and splatters of paint here and there. More than just making your space look presentable, post-construction cleaning is crucial for health and safety reasons. Here’s why: Airborne Dust: If not properly cleaned, construction dust can linger in the air and create an unhealthy breathing environment. This is especially crucial if you have allergies or respiratory issues. Chemical Residues: Many construction materials leave behind chemical residues. These need to be thoroughly cleaned to ensure your space is safe, especially for kids and pets. Phase 1: The Rough Clean Starting with the Big Debris: First things first, we’re going after the larger items. This includes all those leftover materials that can’t be missed – chunks of drywall, wood scraps, and larger dust bunnies. It’s like clearing the stage before the main performance. You’ll be amazed at how much space clears up once these big pieces are out of the way. A quick tip: keep a large trash bin handy to make this process smoother and faster. Safety First: Now, let’s talk safety because that’s super important. When dealing with post-construction cleaning, it’s not just about keeping your space clean; it’s about keeping you safe. So, don the gear – gloves, masks, maybe even safety glasses. These aren’t just accessories; they’re necessities. This gear will protect you from inhaling all that fine dust (which is not great for your lungs) and keep your hands safe from sharp objects and irritants. Remember, a safe clean is an effective clean! Vacuum Time: Once the big stuff is out of the way, it’s time to bring in the heavy-duty vacuum. This is where we start dealing with the finer dust particles that have settled on floors, walls, and other surfaces. You’d be surprised how much dust can accumulate, even in places you might not think to look. A regular household vacuum might not cut it here – you need something with a bit more power to really suck up all that post-construction dust. This step is crucial in ensuring that your space is not just visually clean but also fundamentally free from construction residue.     Phase 2: The Detailed Clean Wipe It Down, Making Surfaces Sparkle: Now, let’s get to the heart of the detailed clean – wiping down every surface. We’re talking walls, countertops, windows, and more. This isn’t just a quick once-over; it’s about making sure every surface is not only dust-free but also shining. Grab your cloths and cleaning solutions, and let’s get scrubbing. It’s amazing what a difference this step makes. You’ll start to see your space transform, surfaces going from dusty and dull to bright and clean. Remember, it’s these touches that turn a construction site into a home. Deep Dive into Nooks and Crannies: The Hidden Heroes: This is where you become a bit of a cleaning detective. Time to tackle those hard-to-reach spots that often get overlooked. We’re diving into the world of baseboards, window tracks, and those sneaky corners. These areas might seem insignificant, but they can harbor a lot of dust and grime. Grab your smaller brushes and get into those crevices. It’s a bit of extra effort, but it pays off big time, making sure your space is thoroughly clean, not just where it’s most visible. Floor Focus, The Groundwork of Cleanliness: Floors are up next, and they require a special kind of attention. This is more than just a sweep and mop situation. Every type of flooring demands its own cleaning method. Got hardwood? Time to gently but effectively remove any dust and stains. Tiles? Let’s get them gleaming without leaving any streaks. And if your space has carpet, you might want to consider a professional steam clean. Carpets can trap a lot of that construction dust, and a deep clean can make a world of difference, not just for cleanliness but also for air quality. Phase 3: The Final Polish This phase is all about those finishing touches that elevate your space from clean to immaculately polished. It’s like putting the cherry on top of a sundae – that last step that makes everything look and feel just right. First up, we’re going to do a comprehensive walkthrough of each room. This isn’t a casual glance; it’s a detailed inspection to spot any areas we might have missed. Think of yourself as a detective with a keen eye for detail. Look out for any smudges on the walls, missed dust on the shelves, or those stubborn stains that might have

New Build, New Clean: How to Tackle Post-Construction Cleaning Like a Pro Read More »

Professional vacuuming in home office setup.

How to Transform Your Space with Turn-Over Cleaning: A Step-by-Step Guide for Spotless Results

Hey there, folks! Are you ready to transform your space from a cluttered chaos to a state of crystal-clear calm? If you’re nodding along, turn-over cleaning is the magic wand you’ve been searching for! Whether you’re juggling short-term rentals, managing an Airbnb, or just craving a fresh start in your own home, this comprehensive cleaning approach is your ticket to spotless success. So, why not roll up your sleeves, and let’s dive together into this easy-to-follow, step-by-step guide for achieving those dazzling, spotless results that’ll make your space shine like never before! What is Turn-Over Cleaning? Alright, let’s break it down: What exactly is turn-over cleaning? In simple terms, it’s a meticulous and thorough cleaning process specifically tailored for rental properties or spaces that experience frequent turnover. This could be your Airbnb rental, a short-term vacation property, or even your guest room at home that’s just hosted a bunch of friends or family. Picture this: Your guests have just checked out, leaving behind memories and, let’s be honest, probably a bit of a mess. That’s where turn-over cleaning swoops in. It’s like a cleaning superhero, ensuring that every nook and cranny of your space is not just clean, but pristinely clean. We’re talking about a level of cleanliness that makes the next occupants feel like they’re stepping into a brand-new, never-before-lived-in space. And it’s not just about cleanliness. Turn-over cleaning is also about creating a welcoming, inviting environment. It’s the kind of clean that says, “Hey, we’re glad you’re here! Come on in and make yourself at home.” It’s about taking care of the little details that show your guests you care about their comfort and their experience. Why Turn-Over Cleaning Rocks: Sets the Standard High: This kind of cleaning raises the bar. It’s not just about making a space look good; it’s about making it feel good, too. Custom-Tailored for Rentals: Turn-over cleaning understands the unique needs of rental spaces. It’s not just a one-size-fits-all approach; it’s a specialized, deep-cleaning process designed to address the specific challenges of rental properties. Saves Time and Stress: Let’s face it, cleaning can be a chore, especially if you’re juggling multiple rentals. Turn-over cleaning streamlines the process, making it more efficient and less stressful.     Step 1: Plan and Prepare Kickstarting your turn-over cleaning journey begins with a well-thought-out plan. Think of it as prepping for a mini-adventure where the treasure is a spotless, guest-ready space. Your first step? Crafting a detailed checklist. This isn’t just any list; it’s your cleaning roadmap, guiding you through each room and task with precision and purpose. Now, let’s talk supplies. There’s nothing worse than rolling up your sleeves, ready to tackle that bathroom, only to find your bottle of disinfectant is empty. A real mood-killer, right? That’s why ensuring you have all the necessary cleaning supplies on hand is crucial. We’re talking sponges, scrubbers, eco-friendly cleaning agents, glass cleaners, dusters, and don’t forget those trusty microfiber cloths for a streak-free shine. But it’s not just about having the right tools; it’s also about organizing and cleaning them them effectively. Picture this: You’ve got your supplies neatly arranged, maybe in a portable caddy or a designated cleaning area. This not only saves time but also keeps you in the flow, making the cleaning process smoother and more efficient. And efficiency is key, especially if you’re on a tight schedule between guest check-outs and check-ins. Another pro tip? Personal protective gear. Yes, even for cleaning! Gloves to protect your hands, perhaps a mask if you’re dealing with a lot of dust or strong cleaning agents, and comfortable, non-slip shoes because safety first, folks! And let’s not forget about the importance of timing. Estimate how long each task will take and plan your cleaning session accordingly. This helps in managing your time effectively and ensures that every area gets the attention it deserves. Step 2: Declutter and Tidy Up Diving into decluttering is like the opening act of your cleaning concert – it sets the tone for the whole show. And let’s be real, a cluttered space is like trying to dance in a room full of furniture; you just can’t move freely! The first order of business is playing detective. Scour every nook and cranny for items left behind by previous guests. This isn’t just about being tidy; it’s about respecting the privacy and property of others. Imagine finding a forgotten earring under a bed or a child’s favorite toy hidden in a corner – these are more than just objects; they’re memories and important belongings. By ensuring that all personal items are removed and safely set aside, you’re not just cleaning; you’re caring. Next up, take on the drawers and cabinets. These are often overlooked hideaways where miscellaneous items love to congregate. The goal here is twofold: first, to clear out anything that doesn’t belong, and second, to organize what remains. A well-arranged drawer or shelf doesn’t just look good; it makes life easier for your next guest. But decluttering isn’t just about removal; it’s also about reorganization. It’s like solving a puzzle, finding the perfect spot for each item, ensuring that everything is easily accessible and logically placed. This can mean neatly folding towels, arranging kitchen utensils in an orderly fashion, or simply making sure that decorative items are displayed tastefully. Now, let’s talk under-bed areas. It’s easy to overlook these hidden spaces, but they can be treasure troves of dust and lost items. A quick sweep or vacuum can work wonders, transforming a dusty underbelly into a clean, open space. The beauty of decluttering and tidying up as your first step is that it makes the subsequent cleaning tasks so much more manageable. A decluttered space is like a blank canvas; it’s inviting and inspires you to bring out its best. Plus, it’s mentally refreshing. There’s a certain satisfaction in seeing a previously cluttered room transformed into a neat, orderly space. It’s like hitting the reset button, preparing the room – and you

How to Transform Your Space with Turn-Over Cleaning: A Step-by-Step Guide for Spotless Results Read More »

Cleaning, cloth, hand - Hand holding a cloth cleaning an item

Regular Cleaning VS Deep Cleaning: What’s The Difference?

Hey there, friends! Today, let’s dive into a topic that often leaves many scratching their heads: Regular Cleaning VS Deep Cleaning. Whether you’re tidying up your Toronto pad or considering hiring some professional help, knowing the difference can make your life a whole lot easier (and cleaner!). Regular Cleaning: Keeping it Light and Fresh Let’s expand a bit more on this idea of regular cleaning being like a weekly coffee date with your home. It’s all about maintaining cleanliness and order, making sure your space feels welcoming and comfortable every day. What Does Regular Cleaning Include? Surface-Level Clean: This is the heart of regular cleaning. It’s about dusting off those surfaces that gather the most dust, like your coffee table, bookshelves, and TV stand. Then there’s sweeping and vacuuming the floors, which is pretty much a daily necessity, especially in those high-traffic areas of your home. This helps in keeping the dirt and dust at bay, making your home feel fresher instantly. Bathroom Basics: Now, the bathroom might not be the most glamorous spot to clean, but it’s crucial. Regularly cleaning the sink, toilet, and mirror can make a big difference. It’s about tackling those water spots on the mirror, the toothpaste splatters on the sink, and ensuring that the toilet is hygienic. This routine upkeep makes sure that your bathroom is always guest-ready and a pleasant space for your daily routines. Kitchen Touch-Ups: The kitchen is the heart of the home, and it needs regular love and care. Wiping down countertops is essential, especially after meal prep. Then there’s cleaning the stove top, which can get pretty messy, especially after cooking up those delicious meals. Keeping the sink clean and tidy is also a part of this, ensuring that dirty dishes don’t pile up and become a daunting task. General Tidying: This is all about those little things that add up to make a big difference. Making beds every morning can instantly make your bedrooms look neater. Organizing living areas might involve fluffing up the cushions, straightening up magazines, or just rearranging things to look more orderly. And let’s not forget taking out the trash – it’s a simple task but doing it regularly prevents odors and keeps your home hygienic.     Why Regular Cleaning? Keeps Your Space Neat Regular cleaning is a lot like brushing your teeth. You do it routinely to maintain good hygiene and avoid bigger problems down the line. In the same way, regular cleaning prevents messes from building up. When you keep on top of things like dusting, vacuuming, and wiping down surfaces, you’re essentially stopping clutter and dirt from taking over. It’s about not letting small messes turn into big ones, which can be overwhelming and much harder to tackle. Saves Time This one’s especially for you, busy bees of Toronto! Regular cleaning is all about being quick and efficient. When you clean a little bit every day or week, you’re saving yourself from those long, exhausting cleaning sessions. It’s easier to spend 15-20 minutes a day tidying up than having to set aside a whole weekend for a major clean-up. Plus, when your home is already relatively clean, you’ll find that it takes much less time to get it sparkling. Stress-Reducer Ever noticed how a tidy space just makes your mind feel more at ease? There’s actually a lot of truth to the saying, “A tidy space means a tidy mind.” When your surroundings are organized and clean, it can significantly reduce stress and anxiety. It’s about creating a peaceful haven where you can relax and unwind, without the distraction of mess and clutter. For many people, the act of cleaning itself can be quite therapeutic. It’s a way to exert control over your environment and can be a productive outlet for channeling energy and stress.     Deep Cleaning: The Grand Makeover Alright, let’s dive deeper into the world of deep cleaning. Think of it as a spa day for your home – a less frequent, yet far more thorough pampering session that leaves everything feeling renewed and revitalized. What’s Included? Detailed Dusting: This is like the fine-tooth comb of cleaning. It’s about reaching those spots that are often overlooked during regular cleaning. We’re talking about dusting ceiling fans, which can gather an astonishing amount of dust, and baseboards, which often get ignored but can collect grime and dust bunnies. This level of attention ensures that even the hidden nooks and crannies of your home are squeaky clean. Grout and Tile Cleaning: Now, this is where deep cleaning really shines. Bathroom and kitchen tiles see a lot of action, and over time, grout can become discolored and tiles lose their luster. Deep cleaning focuses on restoring these areas, getting into the grout lines and bringing back that original shine to your tiles. It’s amazing how this can transform the entire look and feel of your bathroom and kitchen. Appliance Overhaul: Sure, we all wipe down the outside of our appliances regularly, but deep cleaning takes it a step further. It involves cleaning inside the microwave, where splatters and spills often go unnoticed, scrubbing the oven to remove built-up grime, and even tackling the fridge – emptying it out, cleaning the shelves, and making sure it’s hygienic and fresh. Window Washing: Windows are our view to the outside world, and keeping them clean can literally change your outlook. Deep cleaning includes washing windows inside and out (where accessible), ensuring that you have a crystal-clear view, whether it’s of the bustling streets of Toronto or the serene backyard. Deep Carpet Cleaning: Regular vacuuming is great for maintenance, but deep carpet cleaning goes beyond the surface. It’s about tackling those stubborn stains and removing deep-seated dirt and allergens. This not only improves the appearance of your carpets but also enhances the air quality in your home. Why Go Deep? Long-Term Maintenance Deep cleaning is essential for the longevity of your home. When you go beyond the surface and tackle the nitty-gritty, you’re

Regular Cleaning VS Deep Cleaning: What’s The Difference? Read More »